

Engineering a Local Serverless Stack with OpenFaaS, and MongoDB
On-Prem AWS Lambda Alternative
I am a cloud and DevOps engineer with a passion for learning . I have hands on in designing, deploying, and managing cloud-based applications and infrastructure, and I am proficient in automating and streamlining DevOps processes using CI/CD pipelines.. My skills extends to multi-cloud environments, leveraging my architectural skills to seamlessly integrate various cloud platforms. If you are interested in working with me or learning more about me, please feel free to contact me via email or LinkedIn.
Following up on my previous article, I continue exploring how we can recreate, within on-premises environments, the kind of services and capabilities typically powered by public clouds.
The underlying question is: what if we found ourselves in a context where we had to deliver cloud-like services such as serverless architectures, event-driven systems, etc but under strict sovereignty or regulatory constraints that prevent the use of hyperscalers?
This is the mindset driving this articles serie.
In this article we’ll look at how to engineer a three-tier serverless architecture, built around functions triggered by HTTP requests that perform computations or operations, and interact with a NoSQL database for data storage and retrieval.
The goal is to replicate a typical cloud-native stack for example, an API Gateway + AWS Lambda + DynamoDB setup but implemented entirely on-premises.
To bring this to life, the tools chosen to power the stack are:
OpenFaaS, serving as the equivalent of AWS Lambda,
MongoDB, taking the role of DynamoDB, and
For the API Gateway layer, OpenFaaS already includes a built-in gateway NATS-based, responsible for routing and invoking functions, similar to the core behavior of AWS API Gateway. On top of that, Traefik is integrated to provide advanced capabilities such as CORS handling, host-based routing, and more flexible ingress management. Together, they effectively recreate the API Gateway’s behavior without introducing a separate service.
To reproduce the setup described in this article, the main prerequisite is to have a Kubernetes cluster available.
As for the other requirements related to the tools and components of the stack, the necessary instructions will be provided progressively as we move through the article.
Database Layer
To begin, we’ll start by deploying a MongoDB instance.
There are no strict requirements regarding the topology of your deployment, this will depend entirely on your specific needs. The key outcome at this stage is simply to have a working MongoDB instance that you can connect to and verify using a MongoDB client or mongosh. You should have a valid connection URI allowing you to perform the basic CRUD operations (create, read, update, delete).
You can use either the official MongoDB operator or the Percona operator, in my case, I chose the Percona one.
To deploy MongoDB using the Percona operator, you can refer to the setup guide here .
Once your MongoDB instance is up and running, and you’ve successfully tested connectivity through a valid URI with full CRUD capability, you can move on to the next step.
Ingress Controller — Managing External Access to Services
To manage external access to the services, and to configure certain aspects such as CORS handling, an Ingress Controller is required.
In my case, I chose Traefik. Beyond exposing services externally, Traefik also provides middleware-based CORS management, allowing fine-grained and declarative configuration.
This setup can also be achieved with NGINX, although the approach differs due to architectural differences in how each controller extends the Kubernetes Ingress API.
NGINX handles CORS through annotation-based configurations, injecting headers like Access-Control-Allow-Origin and processing OPTIONS preflight requests.
Traefik, on the other hand, uses declarative Middleware Custom Resource Definitions (CRDs) to achieve the same functionality.
To deploy Traefik as your Ingress Controller, you can follow the official setup guide here .
Core Component — OpenFaaS
Now let’s move to the core piece of this entire stack: OpenFaaS.
OpenFaaS® makes it simple for developers to deploy event-driven functions and microservices on Kubernetes without repetitive boilerplate code. You can package your code or even an existing binary into a Docker image, instantly turning it into a highly scalable endpoint with built-in auto-scaling and metrics support.
To set up OpenFaaS on Kubernetes, follow the installation guide provided here.
For easier management and interaction with your functions, it’s also recommended to install the OpenFaaS CLI on your workstation.
Building the Application Logic
Now that the stack is ready, we can start creating the actual components.
Before diving into the OpenFaaS functions and configurations, let’s first look at the big picture of what we’re trying to build.
The goal is simple: a web page that displays the total number of visitors, updating each time the site is accessed.
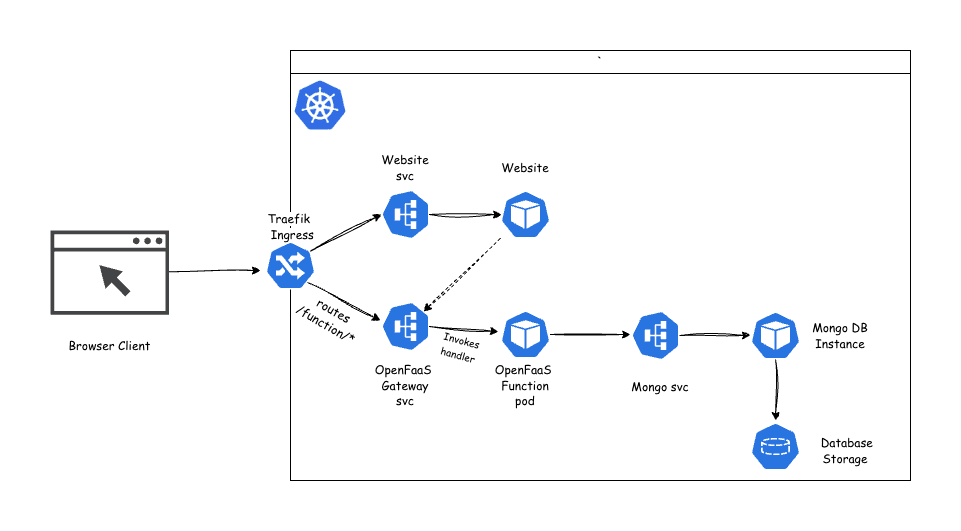
Here’s the general flow:

When a visitor opens the web page, a small JavaScript script (running in the browser) sends an HTTP request to our function endpoint.
The function retrieves the current visitor count from the database, increments it by one, stores the new total, and returns the updated value.
The web page then displays this new count in real time.
You’re free to design your web page as you wish , the frontend doesn’t matter much here. What’s important is the client-side script that interacts with the backend.
Below is what that script could look like:
const CONFIG = {
  baseUrl: "http://function.loacl", // Replace with your Ingress host url
  endpoint: "/function/visitor-counter", // Single endpoint for both GET and POST
  maxRetries: 3,
  retryDelayMs: 1000,
};

async function apiCall(method = "GET", body = null) {
  const url = `${CONFIG.baseUrl}${CONFIG.endpoint}`;
  const options = {
    method,
    headers: { "Content-Type": "application/json" },
    body: body ? JSON.stringify(body) : null,
  };

  let attempts = 0;
  while (attempts < CONFIG.maxRetries) {
    try {
      const response = await fetch(url, options);
      if (!response.ok) {
        throw new Error(`HTTP error! Status: ${response.status}`);
      }
      return await response.json();
    } catch (error) {
      attempts++;
      if (attempts >= CONFIG.maxRetries) {
        console.error(`Failed after ${attempts} attempts: ${error.message}`);
        throw error;
      }
      const delay = CONFIG.retryDelayMs * Math.pow(2, attempts - 1); // Exponential backoff
      console.warn(
        `Retry ${attempts}/${CONFIG.maxRetries} after ${delay}ms: ${error.message}`,
      );
      await new Promise((resolve) => setTimeout(resolve, delay));
    }
  }
}

async function updateAndDisplayVisitorCount() {
  const countElement = document.getElementById("visitor-count");
  if (!countElement) {
    console.error("Visitor count element not found");
    return;
  }

  try {
    // Step 1: Increment count (POST to single endpoint)
    await apiCall("POST");

    // Step 2: Fetch updated count (GET to single endpoint)
    const data = await apiCall("GET");
    const count = data.count || 0;

    // Step 3: Update DOM
    countElement.textContent = count;
  } catch (error) {
    countElement.textContent = "Error loading count";
    console.error("Visitor count failed:", error);
  }
}

// Execute on DOM ready
document.addEventListener("DOMContentLoaded", updateAndDisplayVisitorCount);
Understanding the Script
This JavaScript file is designed to be self-contained and easily portable.
You can include it in any HTML page regardless of your frontend framework as long as there’s an element with the ID visitor-count where the number will be displayed.
Here’s a breakdown of what it does:
Configuration (CONFIG)
Defines connection details such as the OpenFaaS gateway URL, the function endpoint, and retry behavior.
apiCall() function
A reusable helper that performs HTTP calls (both GET and POST) to the backend function.
It includes retry logic with exponential backoff to make the client more resilient to transient network errors.
updateAndDisplayVisitorCount() function
Handles the two key operations:
Sends a POST request to increment the visitor count in the backend.
Sends a GET request to retrieve the updated total and updates the page accordingly.
If anything fails, it gracefully displays an error message in the UI.
Execution on page load
The DOMContentLoaded listener ensures that the visitor count is updated as soon as the page finishes loading.
In essence, this script acts as the frontend bridge to the backend, showing how a webpage can leverage an serverless architecture to provide real-time, data-driven behavior.
You can also follow along using my example by cloning my repository here , then navigating to the website directory, where you’ll find the source code for the web page.
In that directory, there’s also a simple Dockerfile that allows you to build the website image and deploy it on your Kubernetes cluster.
Testing the Frontend Deployment
At this stage, you can already perform a first deployment to verify that everything works correctly on the frontend side.
Of course, we’re not concerned with the visitor count yet since the function hasn’t been deployed but you can still validate the website deployment process, check that the services and ingress are correctly configured, and observe how the JavaScript behaves in your browser by opening the browser’s developer tools and look at the console tab to monitor the network calls and see how the script interacts with the (currently inactive) endpoint.
To deploy the website, you’ll need to create a Kubernetes Deployment, a Service, and an Ingress to expose it externally. if not already created , create k8s namespace for the frontend kubectl create ns <namespace>
Below is the example manifest used in this setup:
apiVersion: apps/v1
kind: Deployment
metadata:
  name: website
  namespace: website
spec:
  selector:
    matchLabels:
      app: website
  replicas: 2
  template:
    metadata:
      labels:
        app: website
    spec:
      containers:
        - name: website
          image: static-site:stable
          ports:
            - containerPort: 80
---
apiVersion: v1
kind: Service
metadata:
  name: website-service
  namespace: website
spec:
  selector:
    app: website
  ports:
    - protocol: TCP
      port: 80
      targetPort: 80
---
apiVersion: networking.k8s.io/v1
kind: Ingress
metadata:
  name: website-http
  namespace: website
  annotations:
    traefik.ingress.kubernetes.io/router.entrypoints: web
spec:
  rules:
    - host: host-url
      http:
        paths:
          - path: /
            pathType: Prefix
            backend:
              service:
                name: website-service
                port:
                  number: 80
Understanding the Manifest
Let’s break this down piece by piece to make sure everything is clear and connected to the overall architecture.
1. Deployment
This section defines how the website application is deployed as pods within the cluster.
replicas: 2ensures two pods are running at all times for high availability and load distribution.The containers block specifies the container image (static-site:stable) and exposes port 80.
The labels are crucial: they tie this deployment to the service definition that follows.
2. Service
The service acts as a stable network abstraction over the pods.
It selects the pods labeled
app: website(set in the deployment).It exposes them internally on port 80, mapping traffic to the same target port inside each pod.
This makes it possible for other components such as the Ingress or other services to reach the website reliably, regardless of pod restarts or scaling events.
3. Ingress
Finally, the Ingress defines external access to your site.
The annotation
traefik.ingress.kubernetes.io/router.entrypoints: webtells Traefik to use its HTTP entrypoint.The rule maps the host url to the internal service (website-service).
Any request to / on that host will be routed to port 80 of the service, which then reaches one of your running pods.
Once this is applied with kubectl apply -f filename.yaml, you can open the host URL in your browser to confirm that the frontend is served correctly.
Even though the visitor counter won’t show up yet, this step ensures the frontend deployment and routing are functioning as expected before we move on to the serverless function layer.
OpenFaaS Function creation
Before jumping into the functions, let’s make things easier by exposing the OpenFaaS gateway through an ingress, just like we did for the website.
That way, you’ll have a clean, simple URL to access the OpenFaaS UI, and also a consistent base URL for your functions which keeps everything tidy and predictable.
Here’s the YAML manifest for that:
apiVersion: networking.k8s.io/v1
kind: Ingress
metadata:
  name: openfaas-gateway
  namespace: openfaas
  annotations:
    traefik.ingress.kubernetes.io/router.entrypoints: web
spec:
  rules:
    - host: host-url
      http:
        paths:
          - path: /
            pathType: Prefix
            backend:
              service:
                name: gateway
                port:
                  number: 8080
Apply it
kubectl apply -f openfaas-ingress.yaml
Once it’s applied, you can open:
UI:
host-url/uiFunction calls:
host-url/function/<function-name>
This gives you a single, consistent entrypoint for both the OpenFaaS UI and your deployed functions
Building OpenFaaS Function
Now that the gateway is exposed and ready to receive requests, it’s time to bring the backend logic to life the actual function that will handle the visitors count.
First, create a dedicated folder to organize your OpenFaaS functions.
$ mkdir -p ~/functions && \
  cd ~/functions
OpenFaaS engine provides buit-in templates for various languages
To fetch these templates, use the CLI:
$ faas-cli template pull
If the specific Python template is not pulled down, you can pull it directly from its repository:
$ faas-cli template pull https://github.com/openfaas/python-flask-template.git
Now let's scaffold a new Python function :
$ faas-cli new --lang python visitor-counter
After running the command, you’ll see these files:
visitor-counter/
├── handler.py
├── handler_test.py
├── requirements.txt
└── tox.ini
stack,yaml
Now let’s open handler.py and replace its content with the following code:
# handler.py

import os
import logging
from pymongo import MongoClient
from pymongo.errors import PyMongoError

# Setup logging for observability (OpenFaaS captures stdout/stderr to Kubernetes logs)
logging.basicConfig(level=logging.INFO)
logger = logging.getLogger(__name__)

# Decoupled config: Load from env vars (set in OpenFaaS YAML or secrets)
try:
    with open('/var/openfaas/secrets/mongo-uri', 'r') as f:
        MONGO_URI = f.read().strip()
except FileNotFoundError:
    logger.error("Secret file /var/openfaas/secrets/mongo-uri not found")
    MONGO_URI = None  # Fallback; will raise in client

DB_NAME = os.getenv('DB_NAME', 'visitor_db')
COLLECTION_NAME = os.getenv('COLLECTION_NAME', 'counters')
DOCUMENT_ID = os.getenv('DOCUMENT_ID', 'visitor_count')

# Global client for reuse (connection pooling)
client = None

def get_mongo_client():
    global client
    if client is None:
        try:
            client = MongoClient(MONGO_URI)
            logger.info("MongoDB connection established")
        except PyMongoError as e:
            logger.error(f"MongoDB connection failed: {e}")
            raise
    return client

def handle(event, context):
    try:
        client = get_mongo_client()
        db = client[DB_NAME]
        collection = db[COLLECTION_NAME]

        if event.method == 'POST':
            # Atomic increment with upsert (handles initial creation reliably)
            result = collection.update_one(
                {"_id": DOCUMENT_ID},
                {"$inc": {"count": 1}},
                upsert=True
            )
            if result.matched_count > 0 or result.upserted_id:
                logger.info("Visitor count incremented")
                return {
                    "statusCode": 200,
                    "body": {"message": "one visitor added"}
                }
            else:
                raise ValueError("Increment failed")

        elif event.method == 'GET':
            # Fetch count (fallback to 0 if missing, though upsert prevents this)
            doc = collection.find_one({"_id": DOCUMENT_ID})
            count = doc.get("count", 0) if doc else 0
            logger.info(f"Fetched count: {count}")
            return {
                "statusCode": 200,
                "body": {"count": count}
            }

        else:
            # Reliable error for unsupported methods
            return {
                "statusCode": 405,
                "body": {"error": "Method not allowed"}
            }

    except PyMongoError as e:
        logger.error(f"Database error: {e}")
        return {
            "statusCode": 500,
            "body": {"error": "Internal server error"}
        }
    except Exception as e:
        logger.error(f"Unexpected error: {e}")
        return {
            "statusCode": 500,
            "body": {"error": "Internal server error"}
        }
Now, let’s deconstruct this function carefully .
Imports:
import os
import logging
from pymongo import MongoClient
from pymongo.errors import PyMongoError
os: Provides access to environment variables and file paths.
logging: Facilitates structured output for observability; OpenFaaS redirects stdout/stderr to Kubernetes Pod logs, aiding debugging via kubectl logs.
pymongo: The official MongoDB driver for Python, PyMongoError allows targeted exception handling for database-specific failures.
Logging Setup:
logging.basicConfig(level=logging.INFO)
logger = logging.getLogger(__name__)
This initializes a logger at INFO level, capturing key events like connections and operations. Errors or info messages can be queried in tools like kubectl or aggregated via ELK stacks.
Configuration Loading:
try:
    with open('/var/openfaas/secrets/mongo-uri', 'r') as f:
        MONGO_URI = f.read().strip()
except FileNotFoundError:
    logger.error("Secret file /var/openfaas/secrets/mongo-uri not found")
    MONGO_URI = None  # Fallback; will raise in client

DB_NAME = os.getenv('DB_NAME', 'visitor_db')
COLLECTION_NAME = os.getenv('COLLECTION_NAME', 'counters')
DOCUMENT_ID = os.getenv('DOCUMENT_ID', 'visitor_count')
The MONGO_URI is read from a file-mounted secret. The try-except block handles missing secrets gracefully, logging the issue while allowing controlled failure. Other values use os.getenv with defaults, enabling overrides via OpenFaaS YAML without code changes.
Connection Management:
client = None

def get_mongo_client():
    global client
    if client is None:
        try:
            client = MongoClient(MONGO_URI)
            logger.info("MongoDB connection established")
        except PyMongoError as e:
            logger.error(f"MongoDB connection failed: {e}")
            raise
    return client
This implements lazy initialization with a global client for connection pooling. The MongoClient is thread-safe, supporting concurrent requests.
Request Handling Logic:
def handle(event, context):
    try:
        client = get_mongo_client()
        db = client[DB_NAME]
        collection = db[COLLECTION_NAME]

        if event.method == 'POST':
            result = collection.update_one(
                {"_id": DOCUMENT_ID},
                {"$inc": {"count": 1}},
                upsert=True
            )
            if result.matched_count > 0 or result.upserted_id:
                logger.info("Visitor count incremented")
                return {
                    "statusCode": 200,
                    "body": {"message": "one visitor added"}
                }
            else:
                raise ValueError("Increment failed")

        elif event.method == 'GET':
            doc = collection.find_one({"_id": DOCUMENT_ID})
            count = doc.get("count", 0) if doc else 0
            logger.info(f"Fetched count: {count}")
            return {
                "statusCode": 200,
                "body": {"count": count}
            }

        else:
            return {
                "statusCode": 405,
                "body": {"error": "Method not allowed"}
            }

    except PyMongoError as e:
        logger.error(f"Database error: {e}")
        return {
            "statusCode": 500,
            "body": {"error": "Internal server error"}
        }
    except Exception as e:
        logger.error(f"Unexpected error: {e}")
        return {
            "statusCode": 500,
            "body": {"error": "Internal server error"}
        }
The entry point branches on event.method, supporting a single-handler design for simplicity. For POST, update_one with $inc ensures atomic increments (guaranteed by MongoDB at the document level), while upsert=True handles initialization without separate checks. The GET uses find_one with a safe fallback to 0. Unsupported methods return 405 explicitly. Wrapping in try-except isolates failures, returning generic 500 errors to avoid leaking details, while logging specifics for debugging.
In requirements.txt, specify the Python package you need:
pymongo==4.10.0
When the function builds, OpenFaaS will install this dependency automatically into the container.
Define the Stack Configuration
Each OpenFaaS function is described in a YAML file, stack.yml.
Let’s define it clearly:
# stack.yml
version: 1.0
provider:
  name: openfaas
  gateway: http://127.0.0.1:8080
functions:
  visitor-counter:
    lang: python3-http
    handler: ./visitor-counter
    image: ghcr.io/davwk/visitor-counter:v1 # Replace with your registry
    environment:
      DB_NAME: visitor_db
      COLLECTION_NAME: counters
      DOCUMENT_ID: visitor_count
    secrets:
      - mongo-uri
    requests:
      cpu: 100m
      memory: 128Mi
    limits:
      cpu: 200m
      memory: 256Mi
provider.gateway→ the endpoint of your OpenFaaS deployment.functions→ list of deployed functions (you can have many).lang, handler, image→ define how the function is built and deployed.secrets→ links the function to the mongo-uri secret.requests/limits→ resource boundaries for Kubernetes scheduling.
Create the MongoDB Secret
Now let’s create the mongo-uri secret before deploying:
$ faas-cli secret create mongo-uri --from-literal="<your-mongodb-uri>"
OpenFaaS will automatically mount it under /var/openfaas/secrets/mongo-uri during runtime.
Build and Deploy
Build the function and deploy it to your OpenFaaS cluster:
$ faas-cli build -f ./stack.yml
$ faas-cli deploy -f ./stack.yml
Once the deployment completes, you can check the UI or test directly via curl:
curl -X POST baseurl/function/visitor-counter -v  # Expect 200 {"message": "one visitor added"}
curl -X GET baseurl/function/visitor-counter -v   # Expect 200 {"count": N}
Your website’s JavaScript file is responsible for sending requests to the backend function. Initially, it probably pointed to a placeholder URL. Now that your function is actually deployed and reachable through your ingress, you should update that URL if required.
Once you’ve updated the JS file, you need to rebuild your website image and redeploy it to Kubernetes so the changes take effect.Test the Full Stack
Now open your browser and navigate to: yourwebsite-url
When the page loads:
The frontend JavaScript automatically triggers the POST request → your OpenFaaS function increments the counter in MongoDB.
Then it sends a GET request → retrieves the new value and displays it on the page.

Troubleshooting CORS Handling Errors
If things don’t work as expected, the most likely issue you’ll face is related to CORS (Cross-Origin Resource Sharing).
To confirm this, inspect the Console tab in your browser’s developer tools if you see CORS-related errors, it’s because the host URL of your website is different from the host URL of your function gateway.
CORS is a browser security mechanism designed to prevent JavaScript code from calling resources from other domains that might execute malicious actions or leak data. So when your frontend and function gateway don’t share the same domain or subdomain, the browser blocks the request by default.
To fix this issue when using Traefik, you can create a CORS middleware resource to explicitly allow requests from your website’s origin (or use a wildcard * if you’re working in a development environment).
So that’s all for this article , thank you for reading, and I hope it was useful to you.
apiVersion: traefik.io/v1alpha1
kind: Middleware
metadata:
  name: cors
  namespace: openfaas
spec:
  headers:
    accessControlAllowMethods: ["GET", "POST", "OPTIONS"]
    accessControlAllowOriginList: ["*"] # Wildcard for dev; restrict to your site origin (e.g., ["http://website.127.0.0.1.nip.io"]) for production
    accessControlAllowHeaders: ["Content-Type"]
    accessControlAllowCredentials: false
    accessControlMaxAge: 100
    addVaryHeader: true
After applying this middleware, update your Ingress for the function gateway to reference it using the annotation below:
traefik.ingress.kubernetes.io/router.middlewares: openfaas-cors@kubernetescrd
Your final Ingress definition should look like this:
apiVersion: networking.k8s.io/v1
kind: Ingress
metadata:
  name: openfaas-gateway
  namespace: openfaas
  annotations:
    traefik.ingress.kubernetes.io/router.entrypoints: web
    traefik.ingress.kubernetes.io/router.middlewares: openfaas-cors@kubernetescrd
spec:
  # rest of the definition
Once both configurations are applied, the CORS issue should be resolved, allowing your site to communicate properly with your deployed functions.